30.8.2023 - 20.9.2023 / Week 1 - Week 4
Michael Chan Henn Loong /
0363611
Advanced Typography / BA of Design (HONS) in Creative Media /
Taylor's University
Task 1 / Exercises
LECTURES
Week 1 - Lecture 1
Advanced Typography: Typographic Systems
Typographic systems is a collection of individual styles used in all kinds of
design to provide a sense of purpose that focuses and directs the
decision-making.
Fig 1.0 Axial System
Axial System: Everything in Axial system are put on either
side of the line, Axial designs can be either symmetrical or asymmetrical around
their axis.
Fig 1.2 Radial system
Radial System: Pick a central focal point, and paste all the
contents around it so that it looks like it radiates out from the point
Fig 1.3 Dilatational System
Dilatational System: Dilational design normally sets along a
circular path, rather then radiating out of a point like Radial system it curves
around one.
Fig 1.4 Grid System
Grid System: With Grid System all text and graphics are meant to be
fitted neatly into columns and rows.
Fig 1.5 Transitional System
Transitional System: Transitional looks like layers stacking up
together.
Fig 1.6 Bilateral System
Bilateral System: Bilateral are known as centered too.
Most of it looks lazy and regular and most of Bilateral designs are arranged
on one single axis.
Fig 1.7 Modular System
Modular System: A series of non-objective elements that
are constructed in as a standardised units.
Fig 1.8 Random system
Random System: A kind of elements that doesn't have any
specific pattern.
Week 2 - Lecture 2
Advanced Typography: Typographic Composition
.png)
Fig 2.0 Emphasis
Principles of Design Composition: Emphasis, Isolation, Repetition,
Symmetry, Asymmetry, Alignment, Perspective, Rhythm & Contrast.
.png)
Fig 2.1 Rule of third
Rule Of Thirds: A Photographic guide for composition which suggests a
frame (Space) that can be divided into 3 columns and 3 rows. The lines are
used as guides to place the points within the provided space.
.png)
Fig 2.2 Environment Grid
Environment Grid: Based on the exploration of an existing structure or
numerous structures combined
.png)
Fig 2.3 Form & Movement
Form & Movement: Explorations on and existing Grid systems.
System is developed for students to explore and to dispel the seriousness
surrounding the application of Grid systems. The placement of a form on a
page creates movements.
Week 3 - Lecture 3
Advanced Typography: Context and Creativity
Handwriting is important in the study of typography because the first
mechanically produced letterforms were designed to directly imitate
handwriting. Handwriting would become the basis or standard for form.
Spacing and conventions mechanical type would try and mimic.

Fig 3.0 Hieroglyphs
-Ideograms that represents the things they depict.
-As determinatives to show that the signs are meant as phonograms
-As phonograms to represent sounds that "spell out" individual words.

Fig 3.1 'Indian' Subcontinent the Indus Valley Civilization (IVC)
The oldest writing found in the 'Indian' subcontinent the Indian Valley
Civilization (IVC) script (3500-2000 BCE), is yet undeciphered and seems to
have been somewhat logo-syllabic in nature.

Fig 3.2 The Brahmi script (450-350 BCE)
The Brahmi script is the earliest writing system developed in India after the
Indus script. It is one of the most influential writing systems; all modern
Indian scripts and several hundred scripts found in Southeast and East Asia
are derived from Brahmi.

Fig 3.3 The Batak Script
This is a page from a Batak handbook on magic and divination.
Week 4 - Lecture 4
Advanced Typography: Designing Type
General process of Type Design
1.Research
-Understand type anatomy, type history, type conventions and terminologies.
-Determine the type's purpose and what it would be used for
-Examine existing fonts that are presently being used for
inspiration/ideas/reference etc...
2.Sketching
-Traditional (Brushes, pen, ink and paper)
Some designers sketches out ideas then only they scan them for the purpose
of digitization.
-Digital tools (Wacom)
Using digital tools would be much quicker, persistent, and consistent
3.Digitization
Professional Software: Font lab & Glyphs app. Some designers also use
Adobe Illustrator to design or craft out their letterforms then only they
introduce it into a specialized font app.
4.Testing
The results of testing is part of the process of refining and correcting
aspects of the typeface. Prototyping is also part of the testing process and
leads to important feedback. Depending on the typeface category the
readability and legibility of the typeface becomes an important
consideration. However it is not as crucial if the typeface is a display
type, where expression of the form takes a little more precedence.
5.Deploy
Even after deploying a completed typeface there are always teething problems
that did not come to the fore during the prototyping and testing phases.
Thus, the task of revision doesn't end upon deployment.

Fig 4.0 Typeface Construction
This is a construction grid for the Roman Capital using 8 x 8 cells. Using
grids can facilitate the construction of letterforms and is a possible
method to build/create/design the letterform.
Fig 4.1 Construction & Considerations
Classification according to form and construction. Many different forms and
constructions must be taken into account when designing a new type. A visual
correction is also needed for the distance between letters. It is not
possible to simply place letters next to each other with equal spacing
between them. The letters must be altered to a uniform 'visual' white space.
Week 5 - Lecture 5
Advanced Typography: Perception & Organization
Contrast

Fig 5.1 Size

Fig 5.2 Weight

Fig 5.3 Form

Fig 5.4 Structure

Fig 5.5 Texture

Fig 5.6 Direction

Fig 5.7 Color

Fig 5.8 Form
Form: The overall look and feel of the elements that make up
the typographic composition. It is the part that plays a role in visual
impact and first impression. A good form in typographic tends to be visually
intriguing to the eye; it leads the eye from point to point, it entertains
the mind and is most often memorable.

Fig 5.9 Gestalt Principles of Grouping
INSTRUCTIONS
Task 1: Exercise 1- Typographic System
In this exercise we are to explore the 8 systems, Axial, Radial,
Dilatational, Random, Grid, Modular, Transitional and Bilateral using
only In design and also the 10 fonts provided by Mr. Vinod.
Rules
-Black, white and one additional color
-Minor graphical
elements
-200 x 200mm
In Design Process
Fig 6.0 Compilation of Attempts, Week 1 (30/8/2023)
Fig? shows the process of the systems I've tried out on my own at home
during Week 1. I started straight away in In Design as it's easier to try
out whether my ideas can me created or not.
Week 1 attempts
Fig 6.1 Axial, Week 1 (30/8/2023)
Axial is actually one of the easy typographic system but because it is
easy so it took me quite awhile to figure out a layout that I'm satisfied
with.
Fig 6.2 Radial, Week 1 (30/8/2023)
For radial I'm just trying to make the contents look like they are
radiating out of a focal point just like what I grasp from the lecture.
Fig 6.3 Dilatational, Week 1 (30/8/2023)
As for dilatational it is one of the system that I struggle with. First of
all I cant think of any ideas that are creative and follows the rule of
the system, all the ideas I could think of are for other systems it's hard
to balance out the contents too. As it is curving around a point like a
circle the words at the bottom will be upside down so it will be hard for
readers to read too. So after all that the only idea I came up with is
Fig? .
Fig 6.4 Random, Week 1 (30/8/2023)
Random is one of my favourite system to play with, as I'm more of a mood
person so this system kind of suites me and I didn't have any problem
dealing with it. For the layout on the left I'm tryin to create a feeling
like the contents falling down from the top and I tried using different
fonts for different words.
As for the one on the right I actually didn't think much I just kind of
followed my intuition and put in stuff here and there I don't really
like this one, because I can recall I did it when I'm extremely sleepy
so when it came out I felt like it's a bad layout but since it's random
so I'm giving it a try, I feel like there's still room for this layout
to improve in.
Fig 6.5 Grid, Week 1 (30/8/2023)
So for grid the top 2 layouts are actually more of a experimental layout I
was just trying out to get ideas so I just kind of put things in columns
and see how they would turn out. The one at the bottom is personally my
favourite I used black as the background before changing to red but I felt
like a lot of my layouts are in black so I tried red and it turns out nice
its pretty compatible with the black text I think it kind of gives out a
horror or maybe serious vibe.
Fig 6.6 Modular, Week 1 (30/8/2023)
As for Modular I actually came up with only one design but with different
background colour, because I could not really decide which one to use.
Fig 6.7 Transitional, Week 1 (30/8/2023)
Transitional is the other system I'm struggling with, I couldn't come up
with any ideas and maybe because I still don't really understand what
transitional system means, so from what I understand of transitional
system I created this layout making the words looks like they are floating
and kind of like layering over each other and also make them look like a
"flow"
Fig 6.8 Bilateral, Week 1 (30/8/2023)
As for bilateral system it's a little bit challenging but fun at the same
time as bilateral is kind of boring and lazy so coming up with design that
I'm satisfied with took some time. The one on the left is a experimental
one. For the idea on the right I get it by thinkin if one is boring why
not just make it into two so I inserted red into it and changed the words
colour.
Week 2 attempts - Revised and Improvement

Fig 7.0 Axial - revised, week 2 (6/9/2023)
In week 2 Mr. Vinod suggested to move the body text to the right side to
balance out the layout.

Fig 7.1 Dilatational - revised, week 2 (6/9/2023)
As what Mr. Vinod mentioned the circular lines don't really add to the
design so I removed the circles.
Fig 7.2 Bilateral - revised, week 2 (6/9/2023)
As for bilateral everything should have central alignment should only have
one axis for the system so I moved all the body texts to the middle.
Fig 7.3 Radial - revised, week 2 (6//9/2023)
For radial I'm using my other design that I've tried out during week
1 for my final submission and from the mistakes I made in my other layout
I noticed the circular in the middle is too big so I tuned it down a
little bit.
Fig 7.4 Transitional - revised, week 2 (6/9/2023)
As for transitional I personally don't like that design too and also
Mr.Vinod said that it looks like it's lost in space so I redo the whole
thing and this is the final idea I got.
Fig 7.5 Random - revised, week 2 (6/9/2023)
As mentioned in feedback my random looks too conservative , so I used some
of the elements in my original layout and thought of a new layout and
added them in to create some "Chaos" .
Final Task 1 - Exercise 1: Typographic Systems

Fig 8.0 Final Axial System - JPEG, Week 2 (6/9/2023)

Fig 8.1 Final Bilateral System - JPEG, Week 2 (6/9/2023)

Fig 8.2 Final Dilatational System - JPEG, Week 2 (6/9/2023)

Fig 8.3 Final Grid System - JPEG, Week 2 (6/9/2023)

Fig 8.4 Final Modular System - JPEG, Week 2 (6/9/2023)

Fig 8.5 Final Radial System - JPEG, Week 2 (6/9/2023)

Fig 8.6 Final Random System - JPEG, Week 2 (6/9/2023)

Fig 8.7 Final Transitional System - JPEG, Week 2 (6/9/2023)
Fig 8.8 Final Task 1 - Exercise 1: Typographic Systems - PDF , Week 2
(6/9/2023)
Fig 8.9 Final Task 1 - Exercise 1: Typographic Systems - PDF ,
Week 2 (Grids) (6/9/2023)
*Did not use grids for some of the systems.
Task 1: Exercise 2 - Type and Play
Part 1: Finding Type
For exercise 2 we are tasked to analyse, dissect, identify and create
our own potential letterforms.
(5 Letters )
1. Chosen Image
Fig 9.0 Chosen Image - Alligator, Week 2 (6/9/2023)
The image I've Chosen is an American Alligator, I've actually
struggled for quite awhile in this phase as I don't really know what I
want as I've found a lot of different images that I see potential in but
I felt like trying something new this time so I chose this alligator
image to be my subject.
Letterform Extraction
Fig 9.1 Traced Letters - A,E,S,O,L,Y,W,G,U,H,P,N , Week 2 (6/9/2023)
I used the pen tool in Adobe Illustrator to traced out the letters
that I see and I found two types of potential letterforms in the image
one is the ones with a fat characteristic another one is the ones with a
pointy characteristics.

Fig 9.2 Extracted Letterforms - N,P,U,H,G , Week 2 (6/9/2023)
So I've chosen to use the letters with a fat characteristics for my
exercise 2.
Reference
.png)
Fig 9.3 Typeface reference - Titan One , Week 2 (6/9/2023)
I chose Titan One as my reference because it has the characteristic as
my chosen letterforms so I could compare what to improve and what to
keep for my extracted letterforms.
Digitalisation

Fig 9.4 Digitalisation in Adobe Illustrator , Week 2 (6/9/2023)
Here is the overview of my attempts in Adobe Illustrator.

Fig 9.5 Original extracted form & Final type design , Week
2 (6/9/2023)

Fig 9.6 Letter N , Week 2 (6/9/2023)

Fig 9.7 Letter P , Week 2 (6/9/2023)

Fig 9.8 Letter U , Week 2 (6/9/2023)

Fig 9.9 Letter H , Week 2 (6/9/2023)

Fig 9.10 Letter G, Week 2 (6/9/2023)
Further refinement
Fig 10.0 New Typeface reference - Bebas Neue regular, Week 3
(13/9/2023)
After receiving feedbacks from the class I decided to change my
reference font as I wanted to change my font design too.
Fig 10.1 Original extracted form & Final Type design , Week 3
(13/9/2023)

Fig 10.2 Letter N,P,U,H,G, Week 3 (13/9/2023)
Final Poster Design

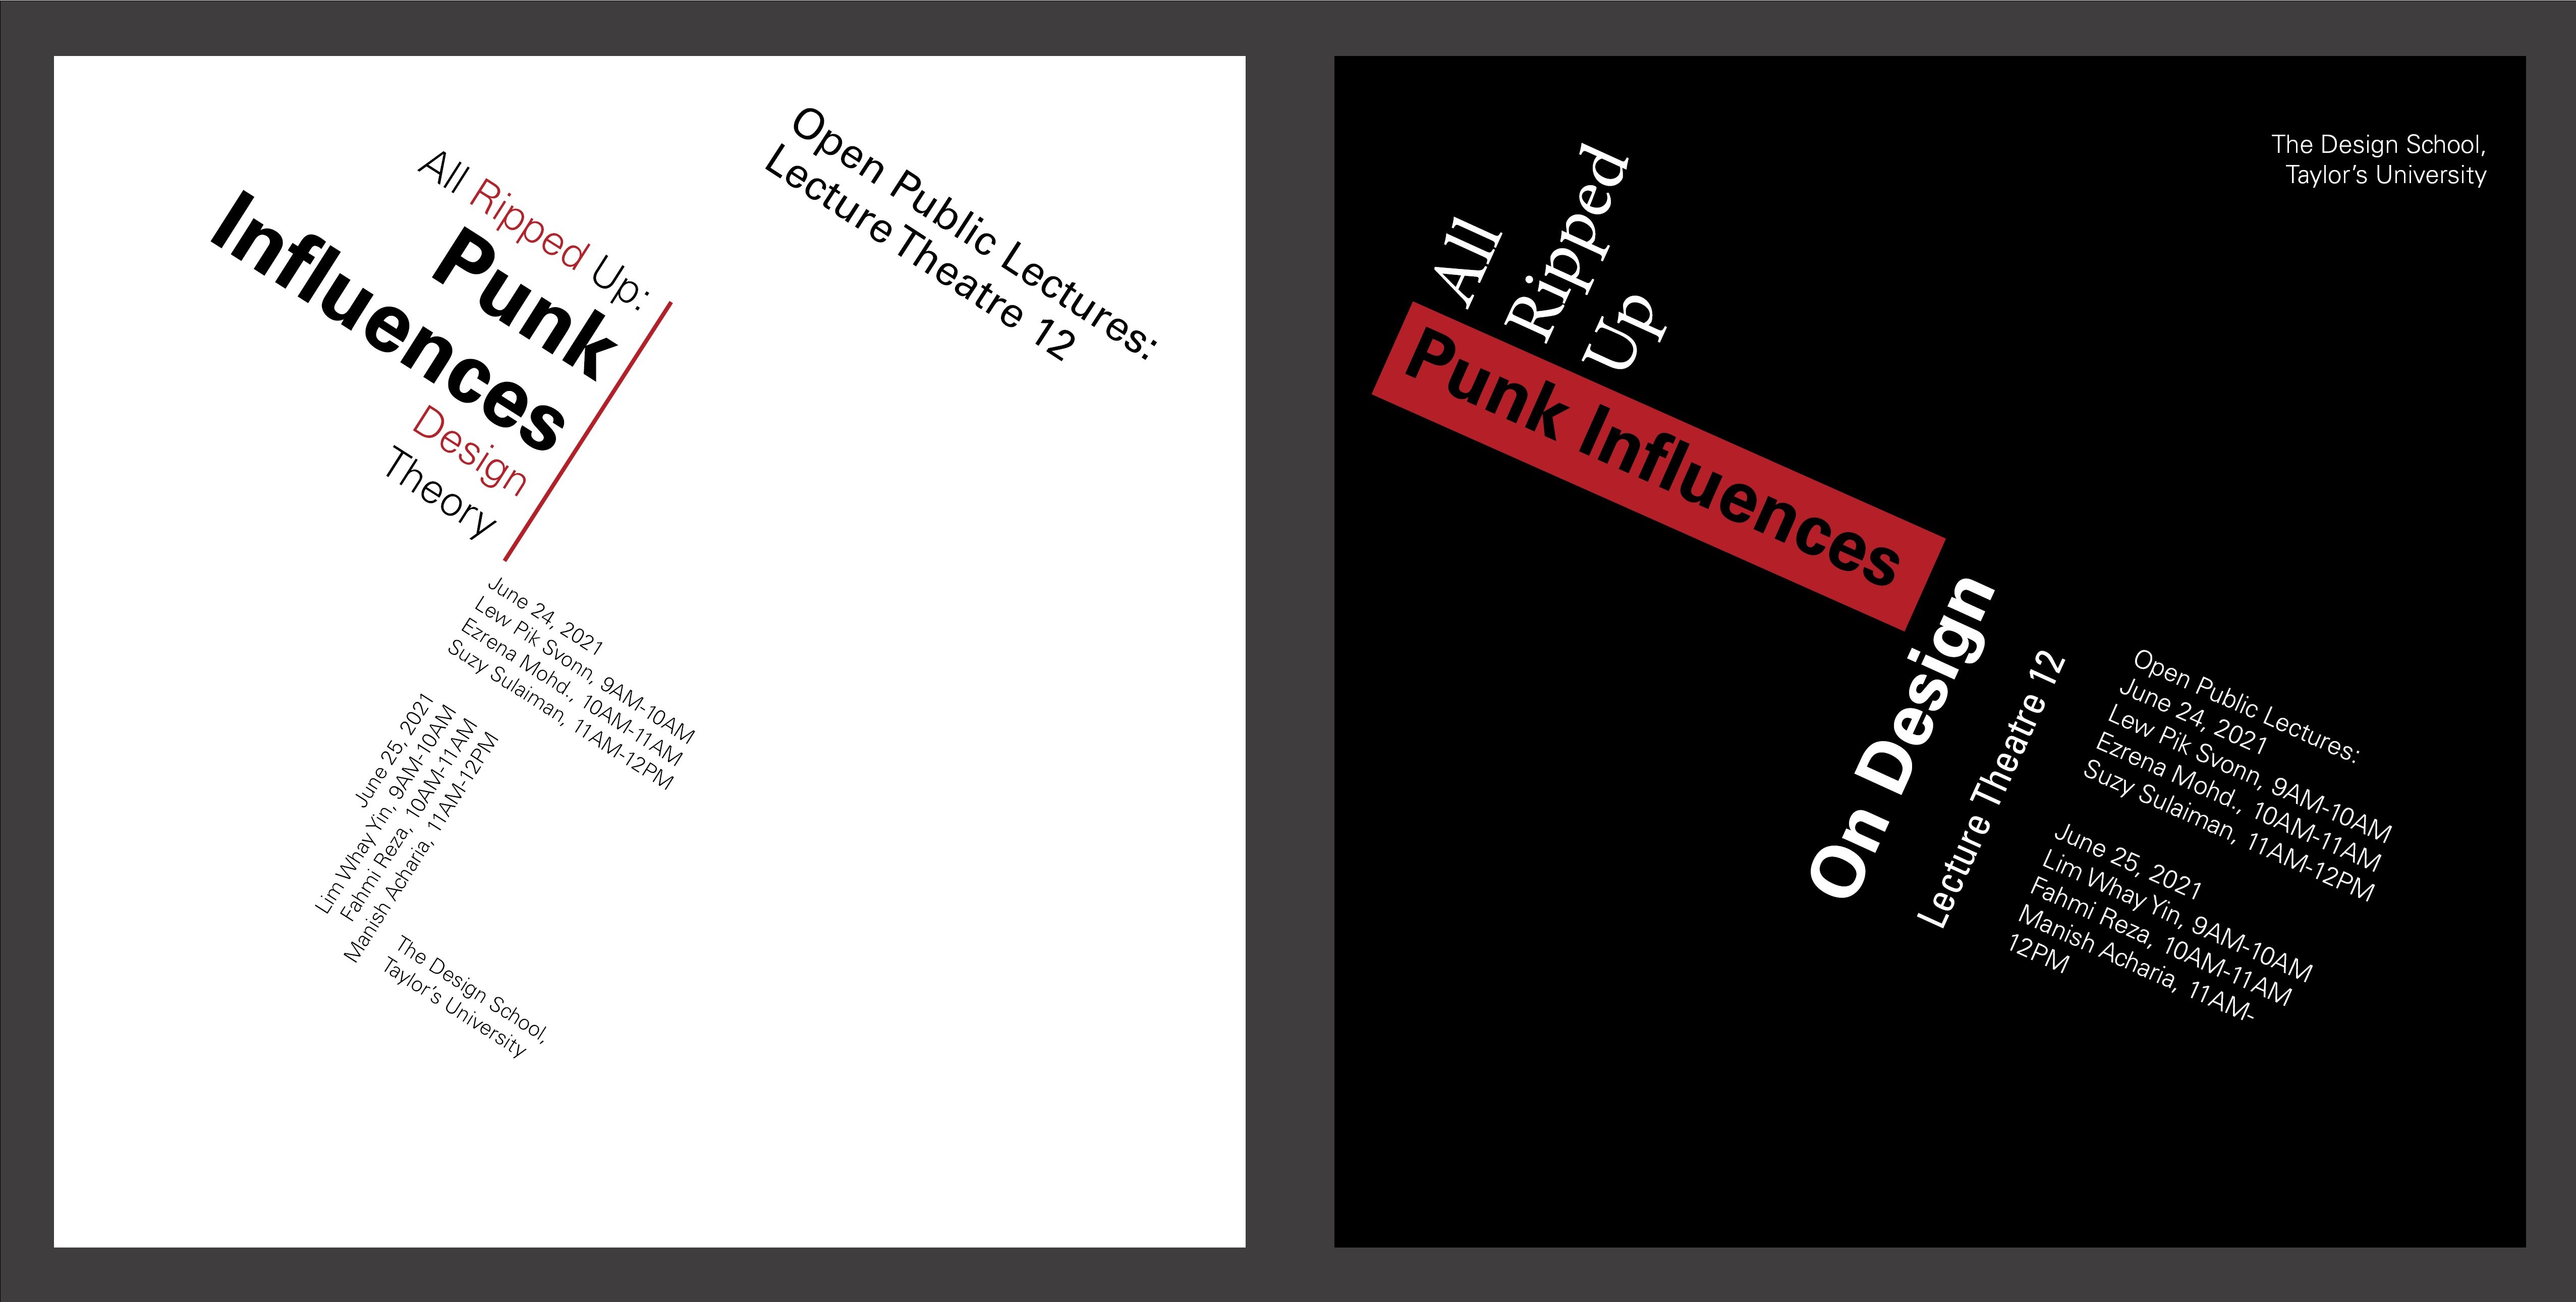
Fig 10.3 Final Poster Design, Week 4 (20/9/2023)
Fig 10.4 Final Finding Type - PDF, Week 4 (20/9/2023)
Task 1: Exercise 2 - Honour Competition (Wallpaper Design)(Renewal of
Life)
So I chose the theme Renewal Of Life as my theme for the Honour
competition and I'm planning to design a wallpaper for it. My idea is
actually drawing two snakes crossing each other and creating a Infinity
logo, Why infinity? Well because I thought that when someone dies,
somewhere else a new child is born so for me life is infinity.

Fig 11.0 Sketches

Fig 11.1 Sketches
Before I start with the digitization I sketched out my ideas and did a
small idea sketching on how I wan my skeletal snake to look like.
Fig 11.2 Process
Fig 11.3 process
.png)
Fig 11.4 process
So for the process I made some small changes to my final design as I see
it fits better like that, and after I finished with the snakes I felt like
adding in two silhouette into my design one is a baby representing new
life one is a old man representing end of life.

Fig 11.5 Final HONOUR competition Wallpaper
Fig 11.6 Final HONOUR Competition Wallpaper
FEEDBACK
Week 4:
General Feedback
-Mr. Vinod gave a talk regarding our
specialisation.
-Size of the poster is 1024px X 1024px
-Know
what the wordmark is designed for, make it in a way that it represents
the owner and pleasing to watch at.
Week 3:
General Feedback
-Consistency
-Time management use more time
to finish up the work
-Try to give characteristics of the subject
to the designed font
-Evaluate own's work
-Identify the
characteristics of the subject don't use cracks to identify the
letter
Week 2:
General Feedback
-Downsize the number by 0.5 so that it balance
off.
-For radial system try not to overlap the words.
-try not
to have too much white space.
-do kerning and leading.
-have
only one axis for bilateral system.
Personal Feedback
-Dilatational: the circular lines don't really
add to the design, if insist on using the circles make sure the words
are not touching the lines it reduces the readability.
-Transitional:
seems a little bit lost in space.
-Random: looks too
conservative.
-Axial: 45degree is too strong.
-Radial: should
be pointing at one point and the circular elements are too
distracting.
-Bilateral: should have central alignment.
Week 1:
Mr. Vinod briefed us on our mib and told us what we need to
do with our assignment.
REFLECTIONS
Experience:
It's a tough start for me since we need to
create 8 layouts in one week for our exercise 1, so after completing
this exercise I feel overwhelmed. But overall it's fun to play and
experiment with the systems. I particularly like Modular, Grid and
Random the most I enjoyed playing with them a lot. I also noticed that I
struggle a lot while creating layouts for Transitional and Dilatational,
it took me a long time to come up with ideas that I'm not even satisfied
with it might be me rushing things so I noticed that I need time to do
my work if I rush my work it would turn out bad.
Observation:
I noticed that I procrastinate a lot in all of
my work which leads to me rushing to finish up the assignments 2-3 days
before the deadline. I really need to improve my time management if I
want to survive in the future tasks, when I review my seniors work or my
colleagues work I just cant help and feel that my work is not up to par,
but every designer is unique so all I can do is improve myself even if
I'm the minor part I'll follow my heart and do my thing.
Findings:
Exercise 1 really is a challenging task as it's
set in a limited time frame and we still need to deal with other
modules, but it's fun too and I've learned that I need to adapt to the
workload and limited time as it's almost the same situation I'll be
facing in my future career life.
FURTHER READING

Fig 12.0 Game Feel by Steve Swink
Week 1
- In the first chapter Steve Swink discussed about what is game feel, so his
answer is that there is no definition of game feel. As players or game
designers, we do have a common language, but we have never collectively
defined game feel for discussing a specific game. For an example if we ask 10
different game designer what game feel is, we will get 10 different answers
and here's the thing all 10 of it is correct. Each answer describes a
different facet, a different field which is all crucial to game feel. By
reading these I noticed that no matter how small how minor our design is our
thought is we are still designers we do what we think is right and we improve
on it, even though sometimes we or even others have problems with our work, we
should keep optimistic and think about others feedback and try to improve our
work in our way that is how we improve. Don't approve someone's work just
because he is famous, don't compromise just because you're the minor part of
it we are designers we do our stuff.
Week 2
Challenge Alters the Sensation of Control
.png)
Fig 12.1 Without focus, the joy becoming boring
- In this topic Steve Swink mentioned that from the point of view of a game
designer there is a problem even with the best sensations of control.
Controlled motion is pleasurable, but that pleasure is fleeting. Even if the
game feels great, aimlessly controlling something gets boring quickly, and I
totally agree with him and by reading this I noticed that in consistency
sometimes we need some chaos, randomize or a focus so that the whole product
wouldn't feel so tedious.
Week3
Game Feel changes depending on the skills of the player
- When picking up the controls of a unfamiliar game, a player will feel
inept, clumsy and disoriented. To an expert player the same game will feel
smoother, crisp and responsive. Each player will start at a slightly different
skill level depending on past experience and natural aptitude, will learn at a
different rate and will attain different heights of skill depending on how
much they practices.


.png)
.png)
.png)
.png)


.png)


.png)
.png)
.png)


.png)


Comments
Post a Comment